
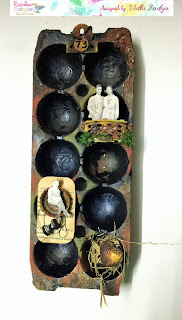
Vintage shadow box !!!
Hello friends,
How are you all? I am enjoying my little summer vacation!!! It's too hot here in India. But still i am enjoying my break. I am back with another Tutorial post for Rainbow Craftykari blog.
This time I created old vintage shadow box from used colour pallet. I just love old vintage look and projects. It was so much fun to create it.

So here is how I made this Shadow box ....
Step 1 : First step is to prime the base.
It is always good to prime the base with gesso, so it holds any further mediums and colours.

I gave it a coat of Black Gesso to entire colour pallet. I applied it as a primer so that it holds the colours perfectly as the material is plastic.

Step 2 : Adding textures. Apply white Crackle texture paste on the pallet randomly as per the image.

For fine crackles effect , let it be air dry for some hours. After that crackles will appear automatically. Then I applied a thin layer of Rust paste + water on pallet that crackles will easily identify.

Step 3 : Roughly placing elements on the pallet.
I picked different things from my treasure , which will go with my vintage shadow box.
After finalizing the stuff, I roughly placed them on colour pallet to decide their places. So it will give me an idea about the final look.

Step 4 : Add colours and textures to the elements.
I selected different types of materials of elements. Some are plastic , metals , fibers etc. So have to colour them first to go with my vintage shadow box. For that I selected Rust pastes from Finnabair and gave a layer of it on all elements.


Step 5 : Gluing and Priming the elements.
One by one I tried to place all the elements in the colour pallet and added some used fabric pieces , threads , beads and mini/mega stones to give more depth to the project.


Step 6 : Time to add coffee splash.
At the end I splashed some coffee stains on the entire project to look more vintage.


Step 7: Final touch up.
For more depth I sprinkled Lindy's magical shakers on some places and added Tim Holtz Sticker as a final step.
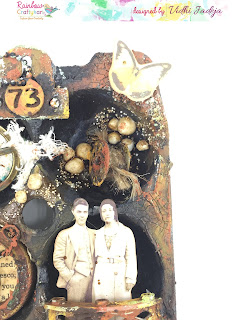

And with that my Vintage shadow box is ready !!!
Supplies Used :
- Black Gesso
- Finnabair Rust Paste set
- White Crackle texture paste
- Glue - Heavy body gel
- Tim Holtz sticker set
- Lindy's magical shakers
- Coffee powder
Most of the above listed materials are available on the Rainbow Craftykari Store and can also be pre-ordered by sending an e-mail at rainbowcraftykari@gmail.com.
Do visit the Rainbow Craftykari store HERE
Visit our BLOG for more inspiration, tutorials and check out our ongoing challenge.
Hope you guys liked it. Look forward to hear from you about your variation of this one !
Happy Crafting ,


Beautiful project Vidhi.
ReplyDelete